Issue Recap
I used GitHub Issues to organize work for me and my other main backend partner, Srijan:
- Starting Checklist: This helped us stay on task and get organized while in the starting stages of development
- Commit Summaries: This summary was updated for each relevant commit. This is incredibly useful for charting our progress and looking at each commit easily. THe supplied text also served as more detailed commit messages. In general, this issue was used the most for organizing work done each day.
We didn’t have many other issues as most of our task delegation was in communication through Slack and/or the checklist issue.
Grading Issues:
- Self Grade Issue - Issue used for personal grading
- Eshika’s Group - Lung Cancer - Peer grade from dress rehearsal
- Lincoln’s Group - Frogs - Peer grade from dress rehearsal
- Nitin’s Group - Colleges - from N@TM
- Will’s Group - Geoguessr - from N@TM
- Hayden’s Group - Ciphers - from N@TM
Backend Deployment
I had a lot of struggles deploying our backend to AWS in the beginning, so I made a blog post a while ago to explain what I faced, and hopefully help other people with the same issues.
DNS
Registering a domain should’ve been a relatively easy process, but there were many struggles that people had, including me. First off, the AWS Route 53 layout looks complicated, to say the least. But when you find the correct spot by going to Hosted Zones > stu.nighthawkcodingsociety.com > Create Record, there’s some problems in the directions. It tells you to create a CNAME record pointing to the domain stu.nighthawkcodingsociety.com, but what this does is redirect first to the site domain, then to the site IP. This chain redirection messes with some web interactions, so it’s better to use the static IP address of the server: 3.130.255.192
- Also, make sure not to edit anything else, it’s best not to change default settings unless you know exactly what you’re doing.
One more thing:
A lot of people have been using a third-party website called Duck DNS for their domains. While this isn’t necessarily a bad thing, using Route 53 isn’t that complicated, will allow classmates and Mr. Mortenson/Mr. Lopez to help troubleshoot your site, and helps them manage your sites easily. I’d highly suggest using Route 53 over Duck DNS.
AWS/Docker Deployment
There’s a few things that people needed to keep in mind when finally deploying their backend:
- Make sure your port is defined in the docker files and available on the AWS instance(use
docker psto view ports currently in use) - Make sure that running
docker-compose upon your host in the correct directory runs the webserver with no issue, on the right port - Once you are finished with the first few steps, you can clone the repo on the AWS instance and run the docker build
- Make sure to tailor the NGINX configurations specifically towards your site, and don’t forget to test the configs using
nginx -t - After reloading the configs, make sure your domain is listed in the output for
certbot --nginxA problem I had was that my domain was not listed in the certbot output. I used ChatGPT for help and found that you can use certbot for a specific domain by runningsudo certbot --nginx -d ----.stu.nighthawkcodingsociety.com(insert the right domain name there). I found out that since my domain name had an underscore(_), certbot looked at it as invalid. I was able to quickly solve this by changing the domain in Route 53 and in the NGINX configurations, and reloading everything.
General Tips
- Use sudo for all of your commands, this gets rid of any permission errors you might have
- Read the errors you have, don’t just bug someone else to figure it out for you. ChatGPT and google are great tools for troubleshooting errors, and this way you can also learn more
- Make sure to reload nginx configurations or redo the docker build if you change any configurations
- Try not to mess with the instance(Putting random stuff in .bashrc, using a forkbomb, making annoying cronjobs), it makes it a lot less fun for everybody
Well, that’s all I have. You can view our groups backend site here
Backend Development
Alright, now onto the actual development of the backend. First going into this, I was very confused. I slowly started to understand the structure of the server after experimenting with the Jokes API to make a Create method.
Testing with Jokes
I first started with the jokes.py file in the model folder, where I defined a function that added a joke to the dictionary:
# Function to add jokes(for create method)
def createJoke(joke):
    item_id = len(jokes_data)
    jokes_data.append({"id": item_id, "joke": joke, "haha": 0, "boohoo": 0})
Then, I added some code to use the JSON request body in the API endpoint:
class JokesAPI:
    # Method to create joke,
    class _Create(Resource):
        def post(self): # Accept POST requests
            data = request.get_json() # Get JSON data from the request body
            print(data)
            joke = data.get('joke')
            if joke is not None: # Error handling
                createJoke(joke) # Actually running the method
                return jsonify(jokes_data[-1])
            else:
                return jsonify({'error': 'Invalid data'})
    api.add_resource(_Create, '/create') # Add the method to the /create endpoint
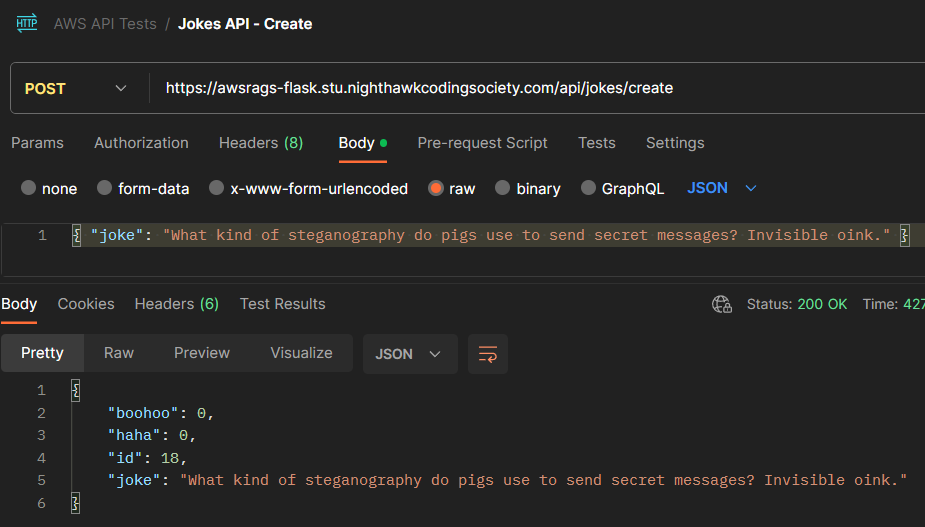
I was able to test this using Postman:

Character Songs API
For our project, we had two main themes we wanted to incorporate: Breaking Bad, and Music Now they seem like completely unrelated things, but I was able to tie them together by making this API, which:
- Uses SQLAlchemy to persisitently store data
- Has a list of songs with artist and genre, for characters from Breaking Bad
- Has both Create and Read methods in order to increase functionality
- Gets lyrics using the
lyricgeniusAPI for each song in the table
In our model, we defined a class with all of our data points:
class Song(db.Model): # Create class
    __tablename__ = "Song"
    id = db.Column(db.Integer, primary_key=True)  # Define a primary key column
    character = db.Column(db.String, nullable=False) # Breaking bad character
    song_name = db.Column(db.String, nullable=False)
    artist = db.Column(db.String, nullable=False)
    genre = db.Column(db.String, nullable=False)
    lyrics = db.Column(db.String, nullable=False)
    def __init__(self, character, song_name, artist, genre, lyrics): # Constructer
        self.character = character
        self.song_name = song_name
        self.artist = artist
        self.genre = genre
        self.lyrics = lyrics
    # Convert db data to a dictionary in order to return easily using JSON, used for read method
    def to_dict(self):
        return {"character": self.character, "song_name": self.song_name, "artist": self.artist, "genre": self.genre, "lyrics": self.lyrics}
    # Create method to let users add a song to the DB
    def create(self):
        try:
            db.session.add(self)  # add prepares to persist object to table
            db.session.commit()  # SQLAlchemy requires a manual commit
            return self
        except:
            db.session.remove() # remove object from table if invalid
            return None
        # Read method to return every part of the table
    def read(self):
        return {
            "id": self.id,
            "character": self.character,
            "song_name": self.song_name,
            "artist": self.artist,
            "genre": self.genre,
            "lyrics": self.lyrics
        }
In this I created a table with different columns to sort each data type, then defined methods to both read from and add to the database. These methods are very useful when trying to integrate CRUD in the frontend. But now that the table is created, it needs data. This is where the initSongs() function comes into the spotlight. This function is called at the start of running the server, and initializes the database with data. For some projects, this data can be webscraped or gotten through a 3rd party API, but for this we just inputted manual data since there wasnt any clear way to automate it. We also depended on user input from the create method in order to populate the data more, and this worked pretty well since the data is stored persistently in the SQLite DB.
class SongAPI:
    class _Create(Resource):
        def post(self):
            # get JSON request body
            body = request.get_json()
            # parse JSON to get variables
            character = body.get('character')
            song_name = body.get('song_name')
            artist = body.get('artist')
            genre = body.get('genre')
            lyrics = body.get('lyrics')
            # Set up Song class object
            song_obj = Song(character=character, song_name=song_name, artist=artist, genre=genre, lyrics=lyrics)

            ''' #2: Key Code block to add song to database '''
            # use method defined in model to create song in database
            song = song_obj.create()
            # success returns json of song
            if song:
                return jsonify(song.read()) # Use read method to show everything
            # failure returns error
            return {'message': f'Invalid input, correct fields should be character, song_name, lyrics, artist, and genre'}, 400


    class _Read(Resource):
        def get(self):
        # Retrieve all songs from the database
            songs = Song.query.all()
            json_ready = [song.to_dict() for song in songs]
        # Return the JSON response
            return jsonify(json_ready)
    # building RESTapi resources/interfaces, these routes are added to Web Server
    api.add_resource(_Create, '/create')
    api.add_resource(_Read, '/')
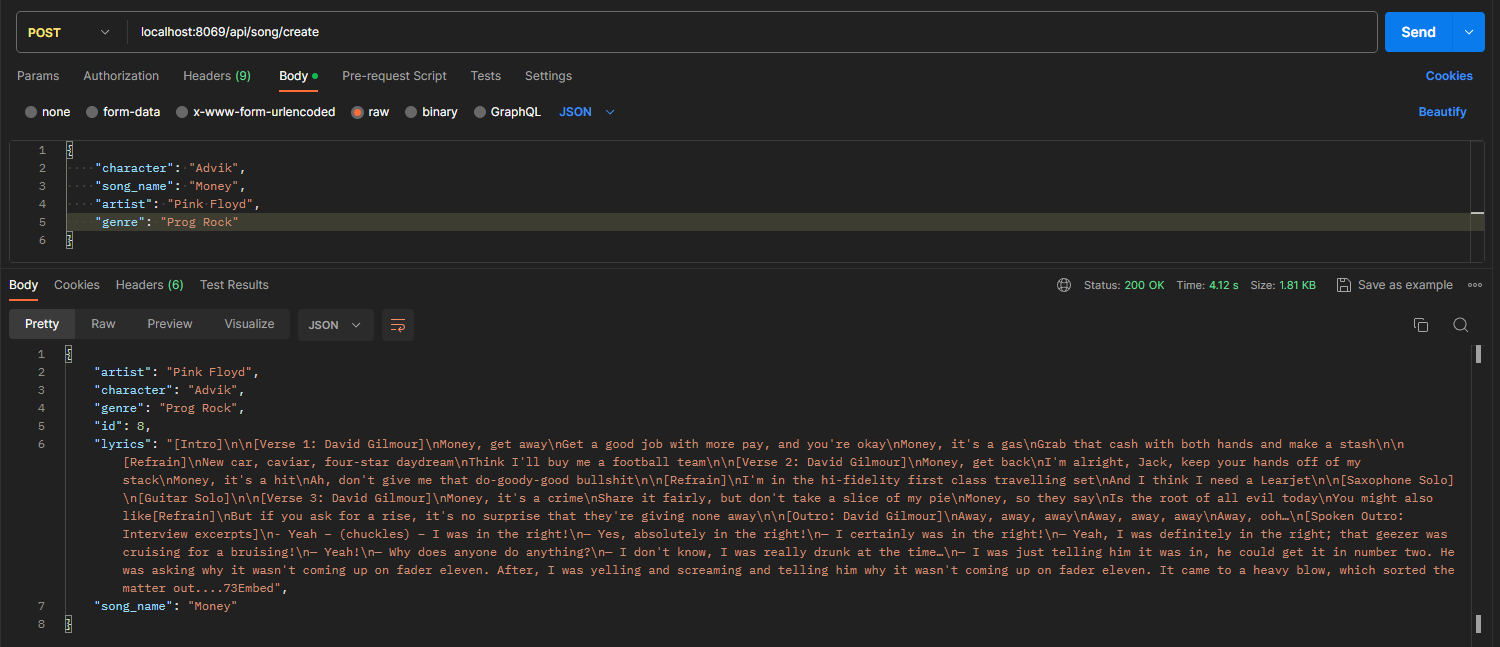
In the API, it was pretty simple to define a read and create method to let the frontend access and write to the DB. We used jsonify for ease of use and simple integration. The create method parses the JSON request body and uses the method defined in the model to add the song to the DB and generate lyrics. This API structure allowed us to format requests easily, as shown here:

Team Teach
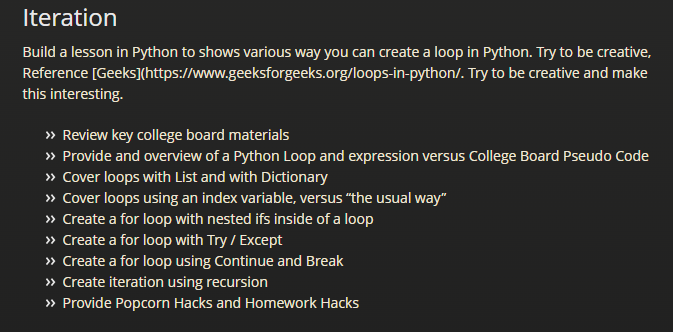
In our group’s team teach(CB 3.7-3.8: Iteration), we split up work at first in order to get a good start on the lesson. I was in charge of creating a rudimentary structure for the lesson that we could follow and develop upon. For this, I used what was avalaible to us in the Team Teach criteria on the teacher website:
 I also used some of the AP Classroom material available in chapters 3.7 and 3.8, and added my own personal knowledge/experience with iteration in python, like while loops and nested for loops. Because of my own experience with python, I was also able to understand the AP pseudo code syntax better when looking over the lesson. Added to this, I helped develop some of the python code, and created Popcorn Hack 3:
- Create a for loop that uses a try and except statement for an ValueError
- Use integers and a list to create scenarios where the loop will either print something expected or print an error message
- CHALLENGE: Try using the
mathmodule for this error This challenge was relatively simple, but the extra challenge was a cool way to introduce people to the ideas of libraries and the different ways errors in python can occur. The following code would give you full points:
from math import sqrt

numbers = [1, 4, -4, 0, 9]


for number in numbers:
    try:
        print(sqrt(number))
    except ValueError:
        print("Cannot take square root of a negative number.")
1.0
2.0
Cannot take square root of a negative number.
0.0
3.0
College Board MCQ
This MCQ was tough and long, 66 questions. I spent a while on it and ended up with a 65/66 points, which was much higher than what I expected:
 Throughout the test, I realized many things:
- AP pseudo code is relatively intuitive, and very easy to understand after the team teaches
- I need to work on time complexity/Big O notation
- I need to also study more general computer science knowledge for the AP test, like computer networking and cyber security
Overall, the test was easier mainly due to the team teaches and coding experience gained in the past trimester.
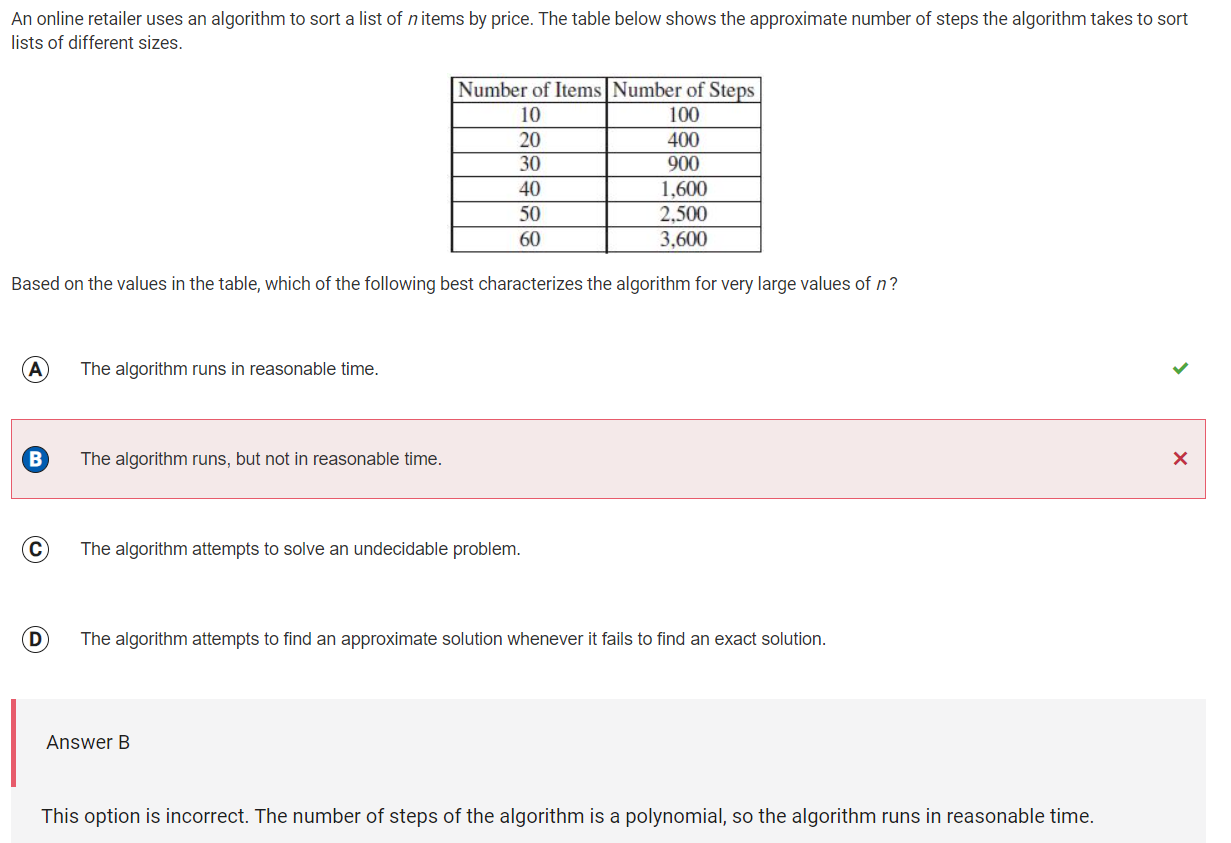
The question I got wrong was about time complexity:
 I now realize I need to do more practice with big O notation and understanding it in context. In this example, I thought that n^2 was an unreasonable time, but after some research I realized there are many n^2 algorithms that still run in reasonable time. I created a program in Python that has n^2 time in order to better understand this:
# Uses selection sort to sort an array in ascending order, this runs in O(n^2) time complexity
def selection_sort(arr):
    n = len(arr)

    for i in range(n):
        # Find the minimum element in the remaining unsorted part of the array
        min_idx = i
        for j in range(i+1, n):
            if arr[j] < arr[min_idx]:
                min_idx = j

        # Swap the found minimum element with the first element
        arr[i], arr[min_idx] = arr[min_idx], arr[i]

# Example usage:
my_list = [4, 68, 7, 12, 22, 11, 35, 46, 76, 876, 97, 90, 5, 3, 345, 5, 6]
selection_sort(my_list)
print("Sorted array:", my_list)
Sorted array: [3, 4, 5, 5, 6, 7, 11, 12, 22, 35, 46, 68, 76, 90, 97, 345, 876]
Trimester 1 Reflection
Over the past trimester, I’ve experienced significant growth in my coding journey. I started with no prior knowledge of web development, and I’ve come a long way since then. One of the major milestones I achieved was creating a backend using Python and Flask, which enabled me to handle the server-side logic of my web applications. This was a substantial leap from my starting point, where I had no experience in this field.
In addition to creating the backend, I successfully integrated it with a frontend hosted on Github Pages. This integration allowed me to build a fully functional web application where users could interact with the user interface, and the backend could process and serve data. This practical experience taught me a great deal about how a website functions as a cohesive unit, with the frontend and backend components working in harmony.
To ensure the proper functioning of my backend, I extensively tested it using Postman. This testing phase was crucial in identifying and resolving any issues, ensuring that the backend could handle requests and provide accurate responses. This practical testing provided valuable insights into the robustness and reliability of my web application.
Furthermore, I delved into the HTML/CSS/JS suite, gaining a deep understanding of these essential technologies. These front-end technologies allowed me to create the visual components of my web application, enhancing the user experience and making my project more dynamic and interactive.
Weeks
Week 0:
- Initial set up, picking partners, working on blog Week 1:
- Figuring out Jupyter Notebooks, basic python, css Week 2:
- Developing games in JS(Snake, Calculator, etc.) Week 3:
- Fully finished CSS for blog site
- Applying python and JS knowledge into creative activities(Websockets, JS Minesweeper, etc.) Week 4 & 5:
- Group up with other pair
- Work on Group Blog site
- Agile methodology
- Introduction to passion project Week 6:
- Web Basics test:
- JS DOM & debugging
- Wireframing Week 7:
- Start Passion Project
- Ideation
- UML backend
- Frontend Design
- AWS Deployment
- CB 3.1-3.2 Data Abstraction
- CB 3.3-3.4 Algorithms Week 8:
- CB 3.5-3.6 Boolean If
- CB 3.7-3.8 Iteration - (Our own lesson)
- Messing around with the Jokes API
- Using Postman to test the APIs Week 9:
- CB 3.9, 3.15 Developing Algorithms
- CB 3.10-3.11 Lists and Search
- Developing Character Songs API
- Fixing database errors Week 10:
- CB 3.12, 3.13 Developing Procedures
- CB 3.14 Libraries
- [] Week 11:
- Finishing Backend and Character Songs API
- N@TM Prep and Dress Rehearsal
Future Plans
My goal in Computer Science is to be able to be independent and help others as much as possible. Outside of class, I try to help my friends debug errors in their code, and I explain things that confuse them. Not only does this help them succeed, it makes me feel good to be helpful and it also helps myself understand the material to a deeper level. In order to do this, I need to also branch out and learn more things. I want to be able to do frontend as well as I do backend, and one thing I regret is not being involved enough with that side of the passion project.
First: I made a very simple JS program to check if a number is positive, negative, or 0 itself:
%%js
// program that checks if the number is positive, negative or zero
const number = -1;

// check if number is greater than 0
if (number > 0) {
    console.log("The number is positive");
}

// check if number is 0
else if (number == 0) {
  console.log("The number is zero");
}

// if number is less than 0
else {
     console.log("The number is negative");
}
I also want to figure out how to use this skills in different contexts, like using React or Node.js frameworks to take my development to the next level, or using Spring with Java, not JS. Programming is so versatile, and I want to be able to utilize it no matter the context.
I have some resources that I plan to use:
